Posts

Assignment 3

Image
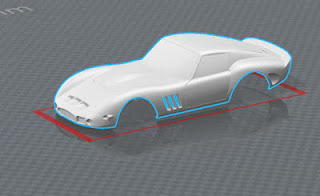
Our task was to create a piece of the skin of a Ferrari 250 GTO out of aluminium sheeting. This tutorial will outline the process required to create the roof and back windscreen of the car.  Before a metal skin can be crafted, a wooden 'buck' must first be assembled to be used as a guide. This will allow for more accurate moulding of the skin as well as making it easier to visualise the end result throughout the process.  The first step in creating this buck is to acquire an .stl file of the model, in this case the car. This file type is a standard type used for 3D object, which can be exported out of programs such as Rhino, AutoCAD and Blender. Secondly, this 3D model needs to be sliced into sections that can b slotted together to form the shape of the car. We used Fusion 360 for this.   This program makes it easy to slice up the 3D model and prepare it for laser cutting.  After loading the model into Fusion 360, there are a number of parameters that need t
Image
We began with the 3D model provided, and sliced it up using fusion 3D. After slicing our model up in fusion 360, and cleaning up some rough edges in AutoCAD, it was laser cut, and the sheets came out looking like this. We made the slots slightly wider, 3.5 mm instead of 3mm, which made it easier to slot together, the next step. It slotted together very easily as planned. We had 7 ribs across, and 15 along. We covered the model in masking tape, which more clearly revealed the elegant contours of the cars body.  Next, we took templates of out respective pieces, with mine being the windscreen and rooftop/back window.  Traced out the template onto a sheet of aluminium. With some simple bends, the windscreen was not too much of a challenge. Just some accurate cutting with tin snips and then filing back the sharp edges. First step was to bend to the metal over the wooden frame to get the general shape. Then i s

Blister

Image

Tray

Image

Reverse Curve

Image

Bowl complete!

Image